This End-User License Agreement ("License Agreement") is a binding
agreement between you (either an individual or a single entity) and
MikroTikls SIA ("MikroTikls" or "MikroTik"), which is the manufacturer
of the SOFTWARE PRODUCT ("SOFTWARE PRODUCT" or "SOFTWARE") identified
above. HARDWARE refers as the computer, which the Software Product is
installed on.
We Just share what we gets from google:
ISO:
MikroTik ISO File Download
RAR:
Mikrotik version 3.20 + crack
Full License:
Mikrotik versi 2.9.27 license level 6
Other link to download
Other link to download
With Serial:
Mikrotik with Serial
Friday, October 21, 2005
Wednesday, October 12, 2005
Install Mikrotik di VMware
1. Download mikrotik iso
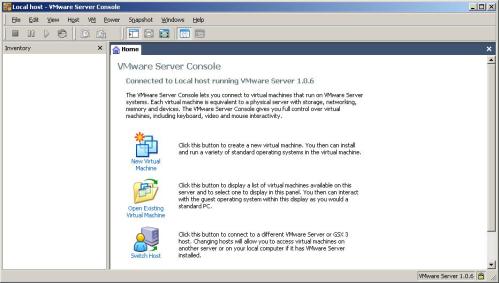 choose new virtual machine
 choose typical
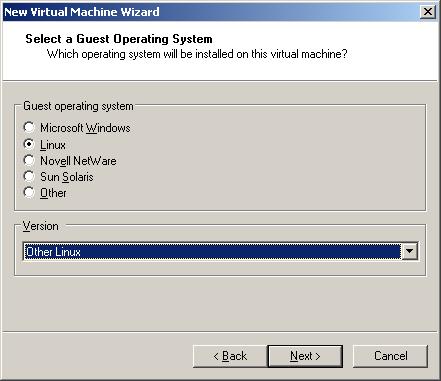 choose operation system linux cause mikrotik duplication from linux for version choose other linux.
 give name and place virtual machine
 For network connection choose bridge networking.
Disk capacity for installation vmware.
If everything is finished vmware look like this.
But we can make cd rom using file ISO mikrotik has been downloaded, and for our hardisk we can remove and we can add and choose IDE type.
 this picture remove harddisk, now we can try for add again.
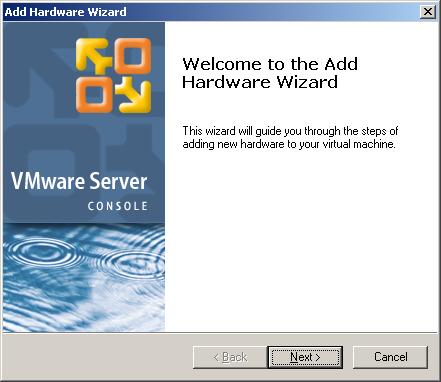 We can choose add Harddisk.
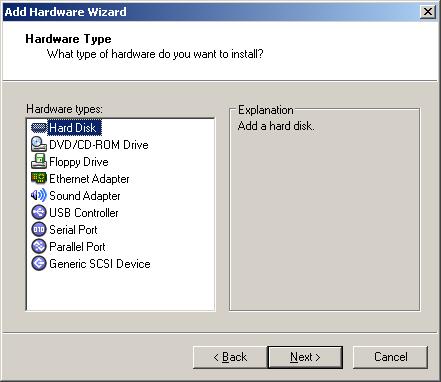 Choose create new virtual disk.
 For disk type choose IDE.
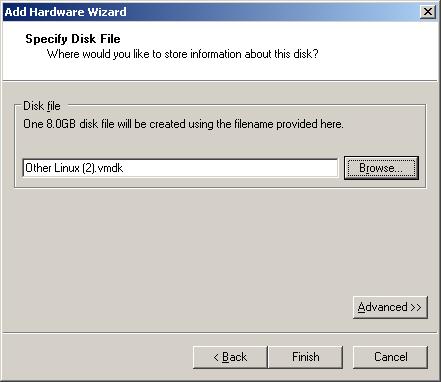
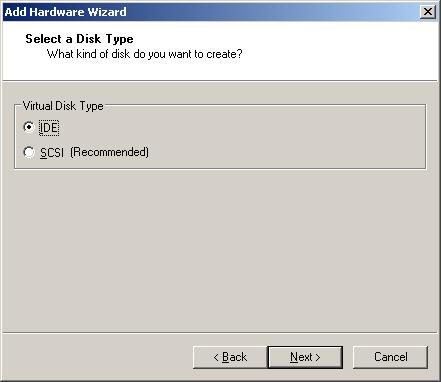 Make file name for our disk.
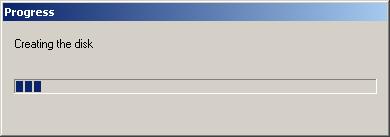
 Waiting process.
 Like this picture harddisk is changed IDE type.
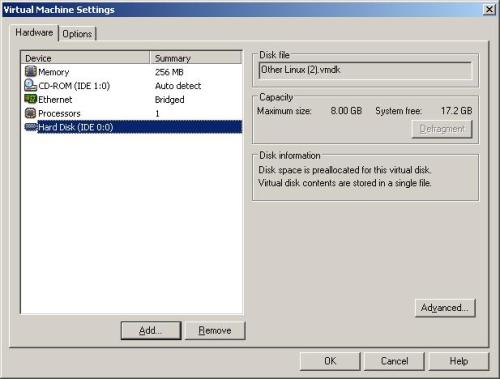 if we want using router we must add hardware ethernet adapters.
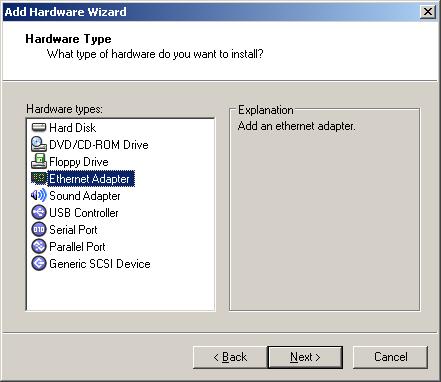 We choose bridge networking.
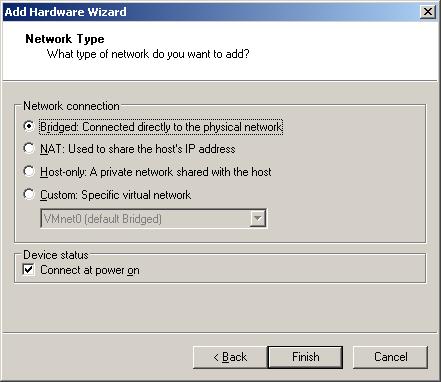 until this result picture.
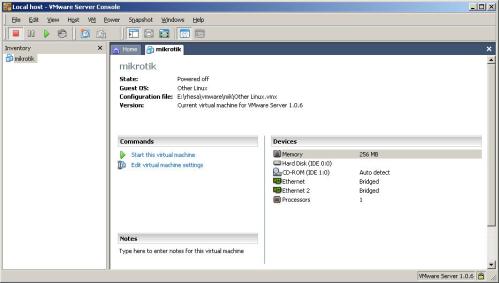 Once again we dont forget, we must setting cd rom for using file ISO if we has downloaded.
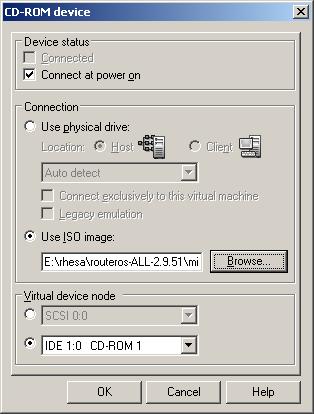 If everything finished we can running mikrotik with play or start
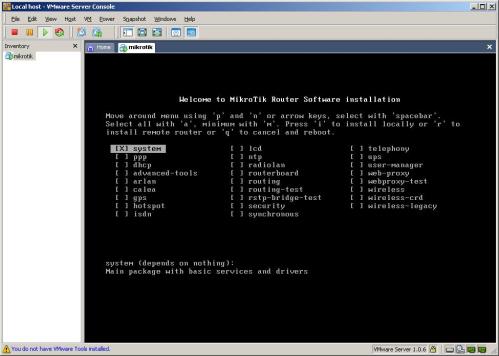 This applications will install choose ‘a’ or all the mean for choose all applications.
 For doing installation choose ‘i’ or install , waiting for 15 minute, your instalasi will be finished and take a reboot.
 After reboot you can login
login : admin
password :
password empty and choose ‘Y’ for reading licensi and ‘q’ for quit from license.
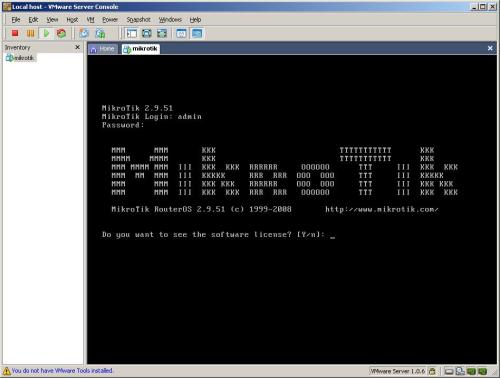 Traaataaa….
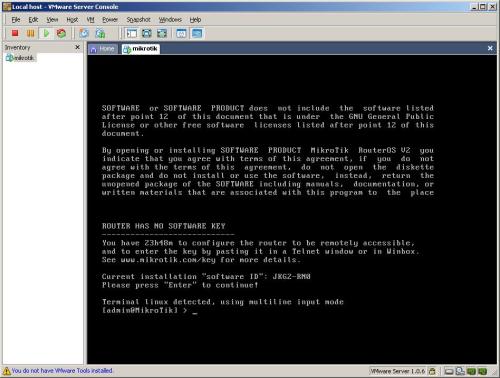 Instalasi selesai
Tutorial lengkapnya bisa didownload disini Download Tutorial ini
source : esjeruk.org


Disk capacity for installation vmware.
If everything is finished vmware look like this.
But we can make cd rom using file ISO mikrotik has been downloaded, and for our hardisk we can remove and we can add and choose IDE type.


login : admin
password :
password empty and choose ‘Y’ for reading licensi and ‘q’ for quit from license.


Tutorial lengkapnya bisa didownload disini Download Tutorial ini
source : esjeruk.org
Saturday, July 2, 2005
Menjadikan Mikrotik sebagai Hotspot dan Radius Server
Mikrotik membuat setting hotspot bisa dilakukan dengan mudah, cukup klik sana sini selesai. Tapi bagaimana dengan kasus dimana usernya banyak (misal mahasiswa yang bawa laptop ke kampus plus tamu plus bla..bla) yang maunya tetap bisa terkoneksi di jaringan tapi tetap bisa di pantau siapa yang login dengan pemeliharaan semudah mungkin.
Jawabnya :
Tambah dukungan authentifikasi dengan radius di hotspotnya /Add authentifikasi with the radius in hotspot.
Caranya juga mudah, step by stepnya :
1. Login to mikrotik (with winbox, putty etc).

2. Click Radius menu like the following image:

3. Click "+" button

4. Isikan data-data yang sesuai, minimal di bagian/input form with the name as follow :
Service -> pilih hotspot
Address -> input ip address server radius
Secret -> input ‘password’ to connect Radius Server
Authetification Port -> default 1812
Accounting Port -> default 1813
Click Apply

5. Muncul bagian service.

6. Click menu
Ip -> Hotspot -> Active
Untuk melihat user yang sedang menggunakan hotspot.
To look active user that using hotspot

User will login with username and password that given by that worksheet.

source: http://alamsyah.rasyid.net
Jawabnya :
Tambah dukungan authentifikasi dengan radius di hotspotnya /Add authentifikasi with the radius in hotspot.
Caranya juga mudah, step by stepnya :
1. Login to mikrotik (with winbox, putty etc).

2. Click Radius menu like the following image:

3. Click "+" button

4. Isikan data-data yang sesuai, minimal di bagian/input form with the name as follow :
Service -> pilih hotspot
Address -> input ip address server radius
Secret -> input ‘password’ to connect Radius Server
Authetification Port -> default 1812
Accounting Port -> default 1813
Click Apply

5. Muncul bagian service.

6. Click menu
Ip -> Hotspot -> Active
Untuk melihat user yang sedang menggunakan hotspot.
To look active user that using hotspot

User will login with username and password that given by that worksheet.

source: http://alamsyah.rasyid.net
Tuesday, April 5, 2005
Install Mikrotik OS dari CD
To install the RouterOS using a CD you will need a CD-writer and a blank CD. Burn the CD-image (an .iso file) to a CD. The archive with image can be downloaded here.
Follow the instructions to install RouterOS using CD-Install:
Note: ref www.mikrotik.com
Follow the instructions to install RouterOS using CD-Install:
- After downloading the CD image from www.mikrotik.com you will have an ISO file on your computer:

- Open a CD Writing software, like Ahead NERO as in this example:
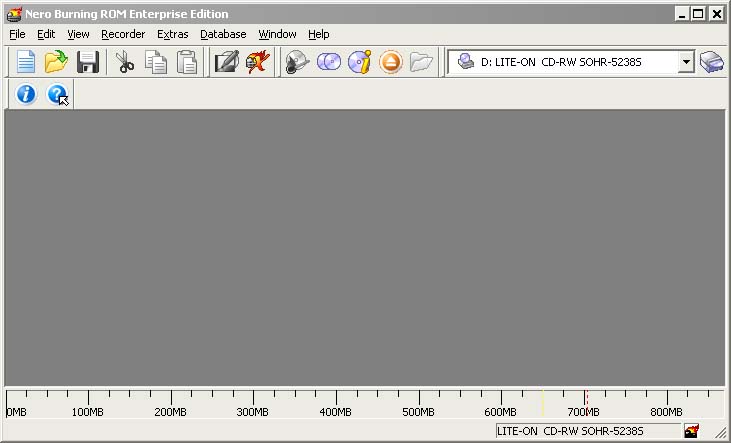
- In the program, choose Burn Image entry from the Recorder menu (there should be similary named option in all major CD burning programs):
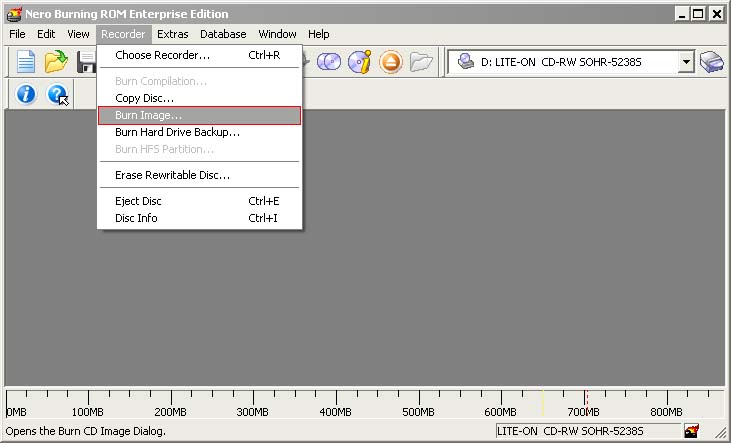
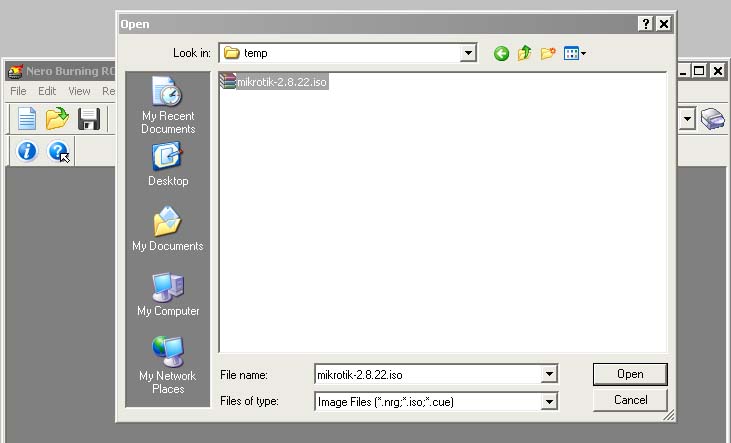
- Select the recently extracted ISO file and click Open:
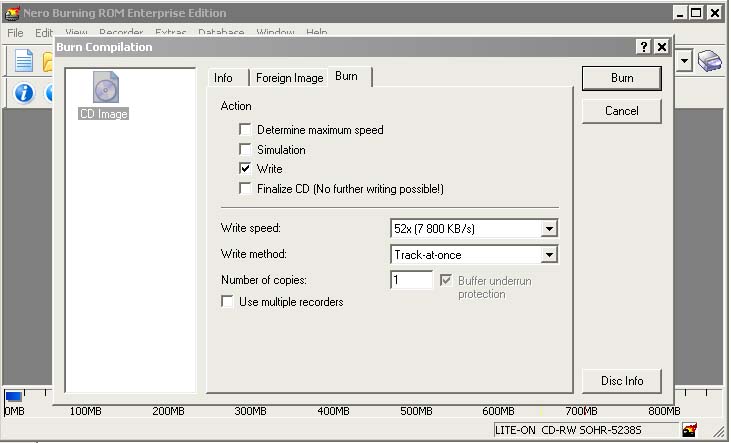
- Finally, click Burn button:
- Set the first boot device to CDROM in router's BIOS.
- After booting from CD you will see a menu where to choose packages to install:
Welcome to MikroTik Router Software installation

Move around menu using 'p' and 'n' or arrow keys, select with 'spacebar'.
Select all with 'a', minimum with 'm'. Press 'i' to install locally or 'r' to
install remote router or 'q' to cancel and reboot.

[X] system               [ ] isdn                  [ ] synchronous
[X] ppp                  [ ] lcd                   [ ] telephony
[X] dhcp                 [ ] ntp                   [ ] ups
[X] advanced-tools       [ ] radiolan              [ ] web-proxy
[ ] arlan                [ ] routerboard           [ ] wireless
[ ] gps                  [X] routing
[ ] hotspot              [X] security
Follow the instructions, select needed packages, and press 'i' to install the software. - You will be asked for 2 questions:
Warning: all data on the disk will be erased!

Continue? [y/n]
Press [Y] to continue or [N] to abort the installation.
Do you want to keep old configuration? [y/n]:
You should choose whether you want to keep old configuration (press [Y]) or to erase the configuration permanently (press [N]) and continue without saving it. For a fresh installation, press [N].
Creating partition...
Formatting disk...
The system will install selected packages. After that you will be prompted to press 'Enter'. Before doing that, remove the CD from your CD-Drive:
Software installed.
Press ENTER to reboot
Thursday, February 10, 2005
Melindungi mata dari radiasi Kompute
Mata merupakan salah satu aset yang paling berharga sehingga harus dijaga benar kesehatannya. Keseringan melototin monitor komputer bisa membuat mata menjadi lelah. Mata merupakan salah satu aset yang paling berharga sehingga harus dijaga benar kesehatannya. Keseringan melototin monitor komputer bisa membuat mata menjadi lelah. Tahukah Anda bahwa radiasi gelombang elektromagnetik yang ditimbulkan komputer bisa mengganggu kesehatan? Studi yang dilakukan American Optometric Association (AOA) mencetuskan bahwa radiasi komputer dapat menyebabkan kelelahan mata dan gangguan mata lainnya. Kebanyakan gejala yang dikeluhkan responden adalah soal kelelahan mata, pandangan menjadi kabur dan mata kering. Masalah visual lainnya yang timbul adalah soal gangguan sakit kepala dan sakit leher atau bahu. Nah bagi Anda yang sering nongkrong di depan komputer, lindungi dan rawatlah mata Anda dari radiasi yang ditimbulkannya.Berikut beberapa tips yang bisa dilakukan untuk menghindarinya. 1. Pakai pelindung layar komputer (filter) untuk mengurangi radiasi yang ditimbulkan komputer. 2. Pilih layar komputer yang radiasinya rendah, seperti layar LCD (liquid crystal display). 3. Jagalah jarak pandangan mata dengan monitor. Idealnya, jarak minimum antara mata dengan monitor komputer adalah 45 cm. 4. Sesuaikan posisi layar komputer dengan mata, jangan ketinggian dan jangan terlalu rendah karena bisa menyebabkan sakit leher. Selain itu, jika monitor terlalu tinggi dari pandangan mata maka akan menggangu pasokan udara yang disuplai ke otak. Sebaiknya layar monitor diposisikan sejajar dengan pandangan mata. Menurut American Optometric Association (AOA), seperti dilansir Rctimes, untuk mencegah kelelahan mata sebaiknya tempatkan monitor dengan posisi yang ergonomis. Monitor harus ditempatkan pada posisi 16-30 inci dari mata, tergantung seberapa besar layar. Umumnya posisi yang nyaman untuk menatap monitor adalah 20 hingga 26 inci. 5. Sesuaikan pencahayaan monitor dengan intensitas kenyamanan mata. Brightness yang terlalu terang atau terlalu buram tidak baik bagi kesehatan mata. Pencahayaan yang terlalu terang akan membuat mata menjadi silau, sedangkan pencahayaan yang terlalu buram hanya dan membuat mata bekerja lebih keras untuk melihat. Hal ini akan membuat mata menjadi cepat lelah. Untuk itu, cobalah sesuaikan brightness dan contrast monitor hingga mata Anda bisa melihat dengan nyaman. Jangan lupa juga untuk menyesuaikan resolusi dengan karakter di monitor agar dokumen-dokumen mudah dibaca mata. 6. Istirahatkan mata sejenak. Jangan terus-terusan melototin layar komputer. Usahakan sediakan waktu beberapa menit untuk mengendorkan dan mengistirahatkan mata Anda. Ini akan mengurangi kepenatan mata dan otot. Segarkan mata dengan cara memandang ke ruangan lain atau memandang indahnya langit biru atau tanaman hijau. 7. Seringlah mengedipkan mata demi menghindari mata menjadi kering. Jarang mengedipkan mata akan membuat mata menjadi kering. Karena itu sering-seringlah mengedipkan mata, karena dengan berkedip maka mata akan mengeluarkan air mata yang akan menyebar ke seluruh permukaan kornea untuk menjaga mata tetap lembab dan jernih. 8. Pakailah kacamata dengan lensa khusus untuk komputer. Seperti pernah diberitakan, ahli masalah mata (Optometrist) Dr. Jay Schlanger mengatakan beberapa perusahaan kini mulai membuat lensa yang bagian atasnya dirancang untuk melihat komputer, dan bagian bawahnya untuk membaca. Pengguna lensa kontak juga punya solusi, yaitu dengan mengganti lensa kontak generasi baru yang terbuat dari silikon hydrogel. "Silikon jenis ini memungkinkan daya transmisi oksigen yang lebih tinggi dibanding jenis lain," ungkap Schlanger. 9. Perbanyak konsumsi vitamin A agar mata tetap dalam kondisi baik. 10. Jika merasa mata mengalami gangguan, segera pergi ke dokter mata untuk meyakinkan bahwa mata Anda benar-benar sehat. detikinet.com
Subscribe to:
Comments (Atom)
